Showing posts with label scrapbooking. Show all posts

Monday, October 06, 2014

Scrapbooker's Blog Tour


Hello! Loooooong time no post! 
Well, the kid is back at ballet so I now have some time to fill so I better get back to blogging!

I was tagged in a blog hop by Joy...check out her beautiful work here: 
http://thejoyofcreativity.blogspot.ca/. 

So here's the blog tour questions:

1. What am I working on right now?
I've been working on samples for my upcoming class at Bizzy B's.  I've just started teaching there this past month and have a Gelato techniques class coming up that I am very excited about!


2. How long does it take me to create a project?

There is no set time. Most projects I start and stop so often that I have no idea how long it actually takes to complete them!

 3. What are my favorite things to create with at the moment? 
 

 I am loving Silks by Luminarte right now. They are lovely mica infused acrylic glazes. They are simply beautiful mediums!
http://creativeimaginations.typepad.com/.a/6a00d83495455153ef016765b06621970b-pi

 4. How does my writing/creating process work?

I usually wait for a photo or technique idea to inspire me. I also love to get prompts from the submission calls at Canadian Scrapbooker Magazine. 
I also  think up ideas on my walks to work. I will often be listening to the Paperclipping Roundtable podcast on my phone and get many ideas from there.
Then I usually will sketch and/or write down my ideas either on paper or on my phone (especially if I can't scrap right away!) Then I gather up my products and get to work. Just picking out my supplies often takes a lot of time as I really bad at making decisions!

 5. How do I become inspired and stay inspired?
Well, I guess I already answered that a bit above! Oops.  I also do find inspiration in Pinterest, blogs, local shops, design articles and websites. 

 6. What is my signature style?
I usually characterize my style as funky-graphic. I loove trying out new techniques and ideas but I try to ground all the artsi-ness is good design principles (shameless plug for my design class...lol!)
Thanks for reading! I really hope to be back next week!!

Wednesday, April 16, 2014

A little of this...

Things have been pretty good. Mom has been doing pretty well and seems to be responding to medication and for that I am very thankful. 
I've been creating when I can and even tried out for a design team. I know I do not have a prayer of being accepted  but I enjoyed the challenge of preparing an entry. It was just the thing to get my creative juices flowing. I applied to the design team call at The Crafter's Workshop. If you don't know them they make the most wonderful templates/stencils around. I had a few on hand but picked up a couple more at Bizzy B's and got playing. Here's what I made:


I will probably do some tutorials based on these techniques in the coming weeks but wanted to show a little peek of what I've been up to. Thanks for stopping by!

Saturday, January 18, 2014

Design Tips: Visual Triangles

Visual triangles are one of the easiest design tips to learn and use.


Our brains perceive images in familiar shapes. By placing items on our scrapbook pages in a triangle, it allows our eyes to see the page as a whole rather than being distracted by one or two pieces on the page.

It also gives the eye a natural path on which to travel around the layout so that the viewer can take in all the elements one by one. The visual triangle comes from the idea that the eye responds far better to designs including odd numbers of features rather than even numbers – placing just two of any embellishment or photo tends to leave the eye flitting back and forth between the two rather while missing other less dominant elements on the page.
The examples I've show here use a visual triangle with embellishments (except the top that uses large circle cut out frames), but you can create visual triangles with colours, photos or even text such as your title, date, and journaling. 
You can very the size of the elements used in you triangle, they just need to be similar enough for the eye to recognize that they relate.
Don't be afraid to make more than one visual triangle on your page, as repetition is another eye-pleasing design element.

Saturday, January 11, 2014

Breaking down the page: Ninth Birthday

This a bit of an older page, but I love it and can't remember if I shared it here yet or not. It was in Canadian Scrapbooker last summer.

What works:
-good use of anchoring. Separate elements on the page are linked together in a way that moves the eye across the page.

-title placement. The title stands out due to placement and contrast (font shape, colour and size).

-colour pallette. The colour choices on the page were pretty much a no-brainer since the base paper had a beautiful watercolour design (Amy Tangerine's Sketchbook line).

What doesn't work:
- the journaling. I always regret not journaling in black pen. I remember reading Heidi Swapp's "Love Your Handwriting" years ago and she always uses black pen to journal. It helps the journaling standout and not blend in with the other page elements.

-it's a little busy. In retrospect I would have made the embellishment cluster a little smaller. It looks a bit overwhelming and crowded with the journaling. (I never plan my journaling out in advance...bad habit).

Have a crafty weekend!


Breaking down the page is a new feature on my blog designed to help you improve your scrapbooking. Read more about and other blogging categories here: Blog manifesto

Tuesday, December 10, 2013

Today's Tutorial: Photographing layouts and the importance of white balance

Editing your layouts after photographing them can be tedious, but it's an important step in prepping your layouts for submitting to magazines and posting them online. As good as your camera is, editing after photographing will make them look their best. There are two major issues I correct. I will show you a quick and easy way to fix the colour in your layouts today. The other issue I usually fix is the perspective, we'll save that for another day.

Step 1: Open your layout in Photoshop Elements (I use the ancient Photoshop Elements 5 but this probably works in most programs!) Open the "levels" window (CRTL-L). Locate the three droppers and click on the WHITE dropper (see first image):


Click to see larger image


Step 2: Click on a white section on your project (or one section that should be white). This tool sets the white balance in your image. Sometimes the result can be overexposed and blown out. Simply click "reset" and try again. You may need to do it a couple times to get the correct exposure. (see second image):


Way too bright! (click to see larger image)


True to life colours! (click to see larger)


Step 3: Once your happy with your image click "OK". That's it! I find that 95% of the time this is all the lighting/colour correction my projects need. I used to spend so much time adjust colours and running actions but this is  much simpler.


You might be thinking: "That's great but what if my project doesn't have any white in it?" That's a good question. I  add just a little piece of white paper to the edge of my image. I can use it to set the white balance and crop it out after:


I hope you've enjoyed this little tutorial!

Saturday, December 07, 2013

Today's Tutorial: Painting on metal


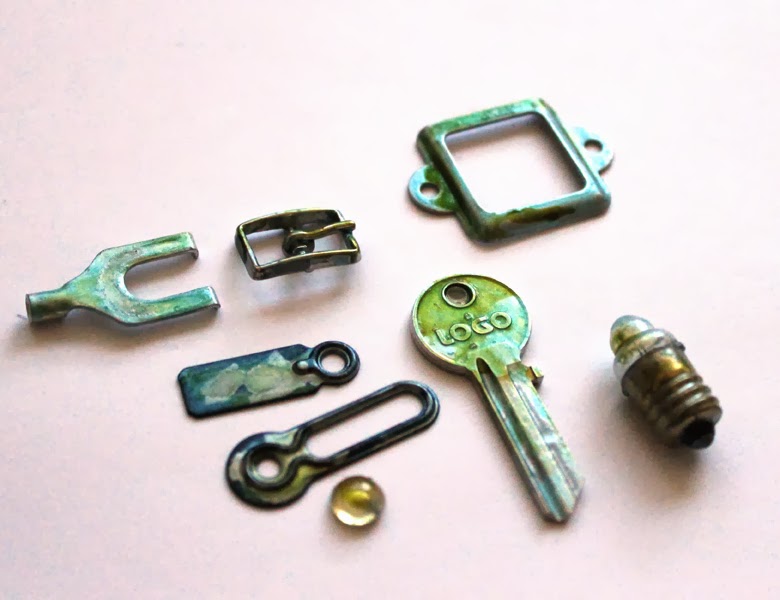
Metal elements are hot in Scrapbooking these days and I am addicted to painting them. My current favourite technique is to paint them a nice silvery colour with some blue and green patina style accents. It's super easy.

 I like to use Distress Paint in Brushed pewter as a base coat (especially nice if your metal is too dark for your project). Then I let it dry, you can heat it with a heat too but keep it well above the metal as it will bubble and leave a bumpy texture. Next, I apply Glimmer Glaze in the colour "All That Jazz", it's nice brilliant blue and looks great over the metallic Distress paint. Finally a few drops of Glimmer Glaze in "Sea Kelp" provides a nice contrast, this colour is really dark so I usually add just a few drops and spread it with a dry brush. (Glimmer Glaze is a sticky, translucent enamelish paint, reminiscent of nail polish. Use with good ventilation.)
Here's a few examples of some I have done in the past: (click on image to it larger)

I


I hope you enjoyed this little tutorial! Thanks for reading!!

Saturday, November 23, 2013

I just like making stuff...


I have had many thoughts of closing down this, poor neglected blog. I've had no time to work on it lately and even when I could find some spare time, I didn't want to.
The picky princess  started over seven years ago as a way of documenting my three year old's day to day life. It quickly evolved, for better or worse into a scrapbooking blog. Pretty soon it was just another place to post my layouts.
I want to change this.
This blog is how I express myself. A diary of sorts of my creative and crafty interests. Honestly, I don't know if anyone would ever want to read it, but I hope so. Scrapbooking has been my creative focus and passion for a long time know and, if I do say so myself, I'm not too bad at it. Scrapbooking isn't all I do though, I just like making stuff, pure and simple.
I've been re-working this blog so I can share what I've learned, what I do and what I think about in the realm of creative craftiness. (Hmm...Vicki's realm of Creative Craftiness...there's a blog title!).
I have come up with seven categories for posting and it's my goal to publish at least three posts a week. My categories are:
  1. Today's Tutorial- I will show you how made something...pretty obvious, I know!
  2. Design Tips- I actually studied a little design theory in college, back in the day. I'd forgotten pretty much all of it, then decided I wanted to teach a class about it. So I spent A LOT of time reading up on design and found out I tend to follow design rules pretty naturally. My $20,000 college education was actually good for something...go figure!
  3. Breaking Down the Page- this is my favourite new segment. I will post one of my layouts and critique it. Every page has elements that work and some that don't. You will lean tips and tricks to improve your scrapbooking...and I will probably too!
  4. Jewellery of the Week- OK, maybe this my favourite segment. I spend my work days with diamonds, gold and all kinds of sparkly things. I photograph all the jewellery in the store and thought I'd share it with my readers. We have some really beautiful pieces that I can't wait to show you. They range from vintage to one of a kind new designs to high end production pieces.
  5. Photography- I love taking pictures and want a place to show them off a little. I hope to include some techniques I've learned along the way too. (I still have so much to learn-and buy-we can do it together!)
  6. Daily Life- This section will probably only interest family members, but you might enjoy a peek into our crazy lives...who knows??
  7. Out and About- My city is pretty darn cool. Toronto is a fun place with a lot of crafty and artsy goodness and I love photographing it!
I hope you will visit me often and stay in touch. I work long hours and sometimes the internet is my only link to the outside world. I want this blog to a community for my friends, old and new. Stop by, grab a glass of wine and stay a while. Leave me a comment...I love the feel the love!

Finally, thank You. Thank you for reading, thank you for stopping by and reading my long winded post. Thank you for maybe adding me to your blog reader, hint, hint.

Saturday, June 01, 2013

Ankles and such...


The ankle continues to heal, slowly. Meet my new BFF:

I bought this tensor brace last summer when I had a mild sprain ( I guess that makes this the fourth sprain, not the third.) At the time I didn't really need it but boy am I glad I have it now. I'm finding it's really helping with my mobility.
I'm STILL WAITING for a final diagnosis on my injury, tomorrow I'll be heading down to see my doctor to get some answers.
**Edited to add: Thanks to a fabulous Doctor today who went to bat for me, I finally have results. No fracture! Yay!!**
I have a new page up today. Thank goodness you can scrap with a sprained ankle, it's keeping me sane.
click to see bigger!!
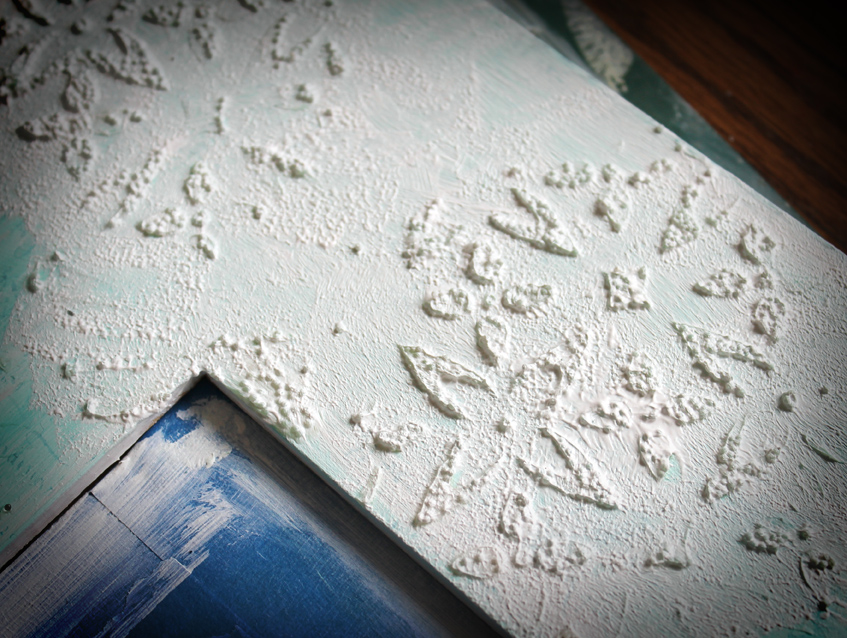
The page's background was made long before I knew what I was going to do with it. I started by using Distress Ink, water and a brayer. Ronda Palazarri has a great tutorial here. Then, I used one of Julie Fei-Fan Balzer's stencils and doodled it inside with Distress Markers. I also used the stencil with Glass Bead Gel.   I added some Italian screen printed paper I bought recently at the Paper Place, some Tim Holtz tissue tape, MME enamel dots, Simple Stories letters and wood veneers and crochet flower from Micheals.

If you are reading this in a reader, pop by and take a look at my new header today, I'd love some feedback.
Thanks for popping by!

post signature

Tuesday, May 28, 2013

Homemade gifts: Flower mirror


I find myself home this week after badly spraining my ankle...again. This is the third bad sprain in 15 years. It hurst like crazy and I can't do much so I might as well blog!
Wanna see??
Ugh! Gross huh? Sorry!! I'm waiting for x-rays, although I'm pretty positive it's not broken. I've been down this road before. Now on to prettier things!

For Mother's day this year I made my Mom this handmade gift. I didn't make the mirror but I did paint it, stencil it with Glass Bead Gel and make each of those tiny numerous flowers. I found this lovely tutorial and used the techniques shown to create said flowers. I used regular printer paper, Distress Ink in Broken China, Tattered Angles Chalkboard spray in Sprout (applied with a Q-tip to the centre) and adhesive pearls.
My Mom loved it so much she's planning on painting the bedroom to match it.

post signature

Thursday, April 18, 2013

On gratitude....

Well, I'm back to blogging. It's been a four month hiatus and I've missed it desperately. Life has a funny way of becoming all about what you have to do instead of  what you want to do. At least, that's what my life feels like lately, and it's not all that fun. There are many things I can't change but what I can. I will.
A few months ago I was Facebook talking with a very smart friend of mine about the path my life has taken lately. She gave me a good talking to and told me to start focusing on gratitude.
Right...
Gratitude and I have a tempestuous relationship at best.  I spent a good part of my twenties feeling bitter and unhappy. In my thirties, I focused on finding beauty in everyday life and the good in the bad (which helped me come out of my post-partum depression fog). I never felt grateful, I still carried resentment deep down. In the past two years it's surfaced when I was confronted with my husband's difficulty with changing careers. I felt life was being hard and unfair again. Everything seemed so easy for others and not for us.
Of course, I know that's not the case.
Well, I followed her prescription of saying out loud five things I was grateful for and then saying thank you three times every night before bed.
I felt a bit silly and worried I wouldn't be able to think of five things!
The very next day, I was leaving to pick up Sid for lunch, I walked out of my building into the pouring rain, sans wallet and umbrella. I got mad at myself for not checking the weather (it's hard to tell from 10 stories up if it's raining or not) and wished I brought my wallet so I could take Sid to a near by Subway instead of walking all the way home in the rain. I looked down and saw a wad of cash on the ground. A cable repair truck was right next to it, I knocked on the door and the guy told me it wasn't theirs. He told me how lucky I was and to enjoy myself.
Now, of course, that hasn't happened everyday, but it has helped my outlook.
A few weeks later I found a long lost gratitude journal when I was de-hoarding my room. Every night I write out my five things. In just over a month I don't think I've repeated very many of my blessings.
I see now that it's simple. Shit happens in life, no question, but you can choose what to focus on.

This past February I turned 40. I'm okay with it, as my Dad says, it beats the alternative. This is the decade to be grateful for what I have instead of feeling resentment over what I don't have.
I now see scrapbooking (and blogging) as another form of gratitude, a way of celebrating and honouring the good in my life.
Here's a new page about two sweet girls I'm grateful for!


Click to see bigger!

I hope to post more very soon, thanks for reading!


post signature


Tuesday, October 02, 2012

Wordless-ish Wednesday...on Tuesday


 Some photos from the last few days...brought to you by my new baby; Ginger.

Sidney at her school's Fall Fair
Sean and Sid at Nuit Blanche

Birthday card for my brother

The Birthday boy and his Mom

Cousins!

Local Flora and Fauna

Neighbourhood Gothic Splendor

Creepy Memorial in Mount Pleasant
COMING SOON!
post signature

Monday, October 01, 2012

Momenta Monday

I made this card for a co-worker's birthday this past week. She always loves my cards so it's always a challenge to make her one more over-the-top than last year. She loves pink, purple and bling, so I turned to my Momenta stash to make the ultimate girly card. 
She loved it!

Click to see bigger!


Momenta Supplies Used:
Cherry Blossom Metal Stickers 17529
Free To Be Me Puffy Stickers (Beautiful)  ST-4698
Banner Stickers ST-5426
Black Puffy Alpha Stickers ST-2346-R2
Purple Embossed Cardstock- All Thru The Year Paper Pad PA-2500 ATTY
Black Embossed Cardstock- Black and White Textured Cardstock PA-2390
Patterned Paper- Kaleidoscope Pyramid Pad-PA2383 

 In other news, I find myself with a bit off time off the next couple weeks, so I hope to blog and create much more than normal, which wouldn't be hard.
See you tomorrow...I hope!

post signature

Thursday, September 27, 2012

Around here...

This post is based on a challenge by Ali Edwards


Around here we are:
- loving the fall air (and all the fashion possibilities it provides)
- learning to navigate this tough time together as a family
- trying to be frugal
- hoping to be better parents and not argue in front of the princess
- shifting work and domestic duties
- realizing that comparison really is the thief of joy
- creating, learning and seeking (and playing with a very fun new camera)
 Around here, we are pretty good.

post signature